0

Christmas cards for a fundraiser – part 2

Hello crafty peeps! Finally found some time to write this blog post about the rest of the cards I made for the fundraiser. Thankfully I did only 5! Guess I am more of a crafter than a blogger πŸ™‚ . So onto the cards ..

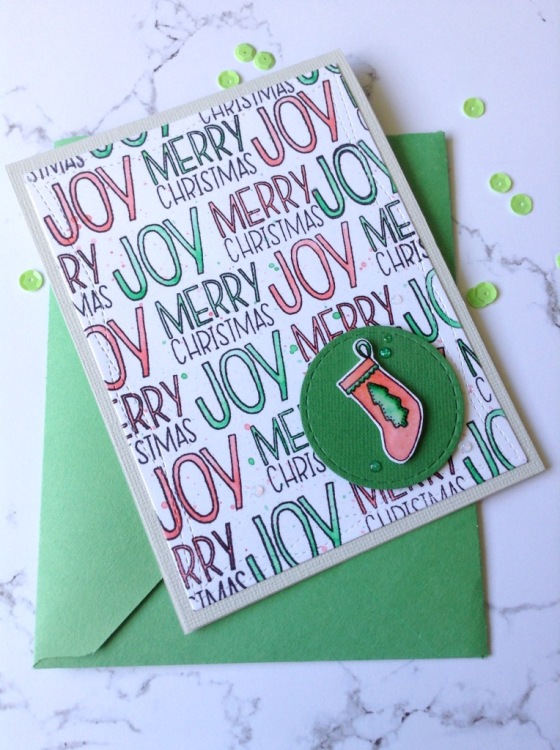
Card 4: Creating a pattern paper using stamps

For this card, I used a CloseToMyHeart stamp set called ‘Joyful Garland’ which I had procured at a destash event last year. I repeatedly stamped the two greetings from the stamp set to create my own pattern paper. This technique is easy, but having a stamping tool makes it a breeze! I then used my Zig Clean Color Markers to color in the greetings in Christmas colors. I also stamped a stocking image onto some watercolor paper and colored that as well with the Zigs. I then fussy cut it out and adhered it onto some green cardstock circle. I then adhered the green circle onto my pattern paper using some foam tape for dimension and then adhered the whole panel onto a white card base. A few clear Nuvo drops finished the card.

Processed with Rookie Cam

Card 5: Card using die cuts

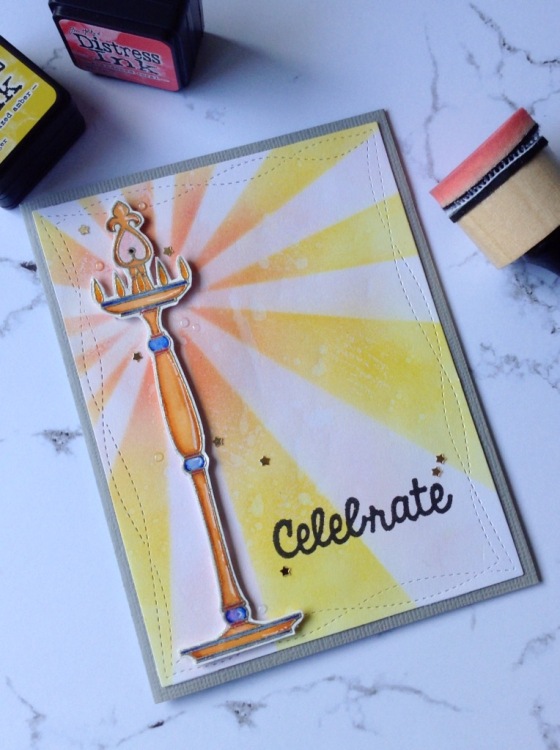
For this card, I decided to use die-cuts instead of stamped images. So I pulled out a wine glass die, which I again got at a destash event (seriously guys..i do a lot of my craft shopping at destashes..saves me a lot of moolah! πŸ™‚ ). I die cut two glasses and I wanted to go for a pink bubbly look, so I watercolored the die cuts using my Zig markers. For added shimmer I used water mixed with PerfectPearls, powder. I simply love the soft shimmer it gives! For the background I used a stencil from Kaisercraft and some Mister Huey’s color mist in ‘Clover’ and spritzed the mist to create my card panel. To make the die cuts stand out I die cut a shaped rectangle out of some vellum and adhered the die cuts to it using some liquid glue. I then adhered the vellum piece onto the card panel using foam tape. I also used a bit of natural twine and created a bow at the base of the die cut glasses. Finally I stamped the sentiment in some red ink to make it stand out better. I then adhered the panel on a A2 sized brown cardstock. A few pink sequins finished up the card.

Processed with Rookie Cam

I had such fun creating all these Christmas cards! I don’t generally give out Christmas cards, so I do not have many Christmas themed supplies; but I was glad that I was able to stretch out whatever supplies I had to create these cards. I hope the fundraising is a success and whoever bids on the cards enjoys gifting them out! πŸ™‚

Happy crafting!!

Tej

0

Guest Design post for Mudra – Floral birthday card

Hello friends! I was at a de-stash event recently and was able to get a set of edge dies I was longing for a while now. If you read back through my posts you will understand that I am a budget crafter πŸ™‚ so I prefer buying stamps to dies and so when this event opened up imagine how high I jumped with excitement πŸ™‚ And add to that the excitement of writing this guest post for Mudra Craft Stamps; its a wonder I was able to stay in my seat to finish writing the post! Please find the post here at Mudra’s blog as well.

I always wanted to use the ‘Botanical Blooms’ stampset from Mudra for a while now and this seemed the perfect time to break it open. I have had this stamp in my stash for a while now and only reason for not using it was not having enough co-ordinating inks; as this is a layering stampset. But I have been building up my ink stash for a while and finally now I have just enough to finally put this stampset to use!

I used a variety of ink cubes from HeroArts, Memento Dew Drops and Distress Inks to create the different flowers. Its so easy to use this stampset – the different layers are clearly marked on the stamp guide, which makes layering a breeze! I simply stamped the first layer with the lightest color and then went darker for the next layers to add the shadows. Such beautiful details on the stampset, just brings the florals to life! Next was the bit I am not much fond of – fussy cutting the images.

I then cut out the card base using wonky rectangle stitched die from GinaMarie designs. Then using the border die, I cut out a border at roughly 1/3 rd height from bottom of the card base. I ink blended lightly using the Tumbled Glass distress ink on the left edge of the card base. For the sentiment, I used the ‘Brushed’ stampset from Mudra and stamped the ‘best wishes’ using Versafine Onyx black ink.

For the card panel, I used a cream colored cardstock from my stash and cut it down to standard A2 size card size. I covered the entire front using some pattern paper. I then foam mounted the card panel onto the card base. I added some black ink splatter and then arranged the florals on the card panel. I adhered some direct to the panel and some on foam squares for dimension.

Embellishments – I went simple, with a few sequins and clear Nuvo drops. I love how this turned out! I am sure I will be using this stampset more and more in future as my ink stash grows! πŸ™‚ I can already think of so many color combinations!

Processed with Rookie CamProcessed with Rookie CamProcessed with Rookie Cam

Thank you so much to Varshitha & the team over at Mudra for giving me a chance to guest design for them. This was my first time and hope I did justice to the beautiful stampset πŸ™‚ and thanks to the readers for sticking with me till the end! Signing off now..happy crafting!

Cheers..

Tej


0

Christmas cards for a fundraiser – part 1

Hello friends..today I am back with a special post. I recently participated in an online fundraising event for mental health. I was so excited to be able to create cards for such an event. I have never before done anything like this and haven’t had the courage to put out my cards for sale either. So this was a big one for me! πŸ™‚

Since it’s the holidays season I decided to create some Christmas cards. I do not have many Christms stamps in my stash as I don’t make many; but I was happy with the different designs I came up with the ones I had.

Card 1: Simple ink blended background

For this one, I used 3 different Distress inks to create the background. For added effect I used the ‘Script’ stamp from Kaisercraft and stamped it repeatedly using the ‘Scattered Straw’ distress ink. I also created some distressed effect by adding some water drops. Finally I stamped the HeroArts layering Christmas tree stamp using some Versafine Onyx black ink. To finish off I added some star confetti and adhered the panel onto some cream colored cardstock.

image

Card 2: Floral Christmas card

This one uses Wplus9 ‘Be Merry’ floral stamp set. I stamped the different florals and leaves using different Β Distress inks at an angle. I also added some black ink splatter. But the card looked a bit too simple. So I cut it out at an angle 3 times. I then adhered all the panels on some brown colored cardstock using foam tape for dimension. Finally I heat embossed the sentiment using white embossing powder on some black cardstock and attached that to the card panel. Added some gold sequins and called it done!

Processed with Rookie Cam

card 3: Layered Christmas trees

This one was very simple to create. I simply used HeroArts layering Christmas tree stamp set and 3 different shades of green ink to stamp the trees. I love this stamp set! Such realistic looking trees. I ink blended the background slightly just so it wasn’t stark white. I then used some embossing paste & Kaisercraft stencil to create the snow effect. To make it really shine I used some laser fine silver glitter from Crafts4U and added it to the snow drops. Finally heat embossed the sentiment from the same stamp set onto some white cardstock suing sliver embossing powder. Love the simple look of this one!

Processed with Rookie Cam

I will add the rest of the cards in a different post..this one is getting a bit too long πŸ™‚

till next time..happy crafting!

Tej

0

Congratulations card for a friend..

Hello again! Today I am back with a slightly different themed card – a congrats card for a friend of mine who moved into a new house recently. Unfortunately I was unable to attend her house-warming party; so decided to send her a surprise card instead.

The focus element on this card is actually a die-cut instead of a stamped image. I was lucky to score a house die at a local papercrafts festival and it was perfect for this occasion. I die cut it a few times for added dimension and adhered the layers together. I colored the final layer using Zig Clean color brush markers. For the card panel, I cut out a circle mask and used the negative of that to mask out a circle on the center of the panel. I ink blended the background using Distress inks. Added some white ink splatter for a sky effect. I love how crisp the lines look after the mask is removed :). I stamped the ‘congratulations’ sentiment along the curve of the circle. Finally I cut the card panel using Gina Marie scalloped edged die. I adhered the panel onto some A2 sized dark blue cardstock. Some nuvo drops and the card is done!

Here is the final look..

Processed with Rookie CamProcessed with Rookie Cam

A bit of personalization – added a speech bubble with their family name to represent their new house πŸ™‚ .

Thats all for today! thanks for reading ..

cheers

Tej

4

Diwali Card & Tags

Hey everyone! With Diwali around the corner, I have been a bit busy with stuff other than regular routine work and sadly crafting as well. Diwali, ‘festival of lights’, is a major Indian festival celebrated throughout India. It involves lighting diyas (small earthern lamps), making paper lanterns, decorating the house, buying gifts for the family and most importantly (and my favourite part) making (read eating) the Diwali sweets & other savory items.
I decided to make a few of my favorites for my kids this Diwali and they sure are enjoying eating them! πŸ™‚
So now onto the Diwali card I created to send back home.
For this card & tags, I used my one & only Diwali stampset from Mudra Craft Stamps called ‘Deepam’. I have noticed recently many more Diwali stampsets being released, but sadly cant have them all! The funny thing about this stampset is that when I saw the images I just jumped and bought it without realising that all the sentiments are in Tamil! I do not understand a single word of Tamil so unfortunatly haven’t been able to use the sentiments, but the main image of the lamp (which is why I bought this stampset) is really beautiful and I decided to use that to make my projects.
For the card, I heat embossed the diya stamp in gold and colored it using Zig Clean Color brush markers. I wanted the diya to stand out so kept the background simple. Using distress inks (Abandoned Coral & Mustard seed) & a stencil from Kaisercraft, I created the background. For the distressed effect, I splashed some water and lifted it using dry paper towel. I die cut the background panel using GinaMarie Dies and adhered the fussy cut diya image using some foam tape for dimension onto it. I stamped the word ‘Celebrate’ using some Versafine Onyx Black ink and then scattered some star confetti as a finishing touch. A couple of clear Nuvo drops completed the card.
Here is the final look.

I am linking this one up too at Paru’s Cardmaking Challenge.

Processed with Rookie CamProcessed with Rookie Cam

For the tags, I used the small diya image and stamped it a couple of times. I used Prismacolor pencils to color these images. Using the LawnFawn ‘Tag you it’ tag die I die cut two tags from white cardstock. I ink smooshed the background with some distress inks, added some gold splatter and stamped the greeting in Versafine Onyx Black ink.
I then fussy cut the images and adhered one direct to the paper and added the other one on foam tape for dimension. Here is the final look.

Processed with Rookie Cam

I am also linking these projects up at the MudraCraft Stamps challenge #14 – festive colors.

Thanks for stopping by! ..

Cheers..

Tej

1

Birthday card using only die-cuts

Hello again! Today I am back with a very simple card with no stamping at all! And wonders of all wonders I was able to finish this card from design in my head to actual completion with final photos within a day!! This is kind of a record for me beacuse I take days..yes days to finish a card. I am a full time SAHM and with two toddlers running around; it leaves me with very little time and energy to sit down and finish a project in one go. So I am quiet happy how this came out!
I decided to use the Memory Box die I scored recently at a crafty destash as my center point and build around that. I cut out the die from some white cardstock and then to finish it framed it using GinaMarie Designs wonky frames die. I used the die again to cut the card panel just so it would match better with the die cut word. Then I broke open my newly acquired Distress Ink Oxides(yay! and I need more of these) and inked up the card panel that would align behind the die cut word. I used Twisted Citron & Salty Ocean DOs. For top of the panel I used a bit of Tumbled Glass Distress Ink. Then spritzed some water on the panel for the distressed look. I also used a bit of KaiserMists white shimmer spray for added interest.
I then heat embossed the edges of the die cut word and the word ‘Best’ using some Versamark Ink and gold embossing powder. I die cut a few stars and heat embossed them in gold as well. Then I popped up the die cut using some foam tape. I used some bright pattern paper from my stash and adheared the whole thing together using some double sided tape to an A2 sized blue card. Finally attached the stars using some Multi Medium Matt glue and finished with clear Nuvo drops.
I am entering this card in the latest challenge up at Paru’s Card Making Challenge blog where the challenge is to make a card/tag using gold. I think this fits the bill πŸ™‚ .

Processed with Rookie CamProcessed with Rookie Cam

Thats all for now! Happy crafting..

Tej

0

CAS birthday card

Hey all! I am trying to keep up with my resolve of not neglecting my blog much. So I am back today with another birthday card. This one is a bit special as its for my hubby dearest! I tried to keep it simple as he is not much into the over the top stuff..simple is the best πŸ™‚
For this card, I tried to represent our kids and our recent trip to Bali where we really enjoyed the elephant safari tour that we took. That was a great experience and the kids really enjoyed it.
So onto the card, naturally I had to use my WPlus9 ‘Unforgettable’ stampset. This has the cutest little elephant images. I stamped two of those onto some white cardstock using Memento Tuxedo Black and colored them using my FineColor Alcohol markers. (yes..I crave the Copics but the price always holds me back :(..one day hopefully!). I then fussy cut out the images. For the card panel, I used MFT’s balloons stencil and ink blended some balloons using Peacock Feathers Distress ink. I also used AveryElle’s ‘Balloons’ stampset to stamp a few small balloons using the Fossilised Amber distress ink. I then used Altenew’s ‘Halftone Happy’ Stampset to stamp the word ‘happy’ using some copper metallic ink and heat embossed using clear embossing powder. Then I cut out the panel using GinaMarieDesigns ‘wonky rectangle’ die for a more finished look.
I wanted to create a scene wherein it looked as if the elephants were holding up the ‘happy’ banner. So I placed the cut images accordingly using some foam
tape and finished the card with some gold gel pen dots and star confetti. Finally I adhered the card panel on some A2 sized kraft cardstock and called it
done! πŸ™‚

SONY DSCSONY DSC

Thanks for stopping by! Cheers..

Tej

1

Personalized baby shower card

Hello..back after a while now.I have been neglecting my blog and also card-making for sometime, but not any more! πŸ™‚ I am back today with a personalized card..and that is also a major reason I love card-making..you can create a card which is personalized to the recipient making it more appreciable than a store bought one! Its fun to see the persons face light up when they get the card that they can relate to it..
So today I am back with a baby shower card..sadly I do not have any baby related stamps in my stash, so I decided to create a scene with a selection of different stamp sets to represent my theme. I mainly used stamps from Purple Onion Designs (my very favorite rubber stamp company). I love love their designs and so wish I could find some here in Australia. Lucky for me, my sister lives in the US and was able to get some to me at our last get-together.
So onto the card..I stamped the images I wanted onto some white cardstock. I also used LawnFawn’s ‘Critters from the Past’ stampset to stamp the little egg with baby dinosaur popping out. I colored all the images using Prismacolor pencils and then fussy cut them out. For the ‘father’ owl I used AveryElle’s ‘HipsterPotams’ set to stamp the glasses πŸ™‚ . For the background I repeatedly stamped the blossoms from POD and colored again using my color pencils. I added a layer of vellum to make the images stand out better against the background. I then heat embossed the ‘Congratulations’ sentiment using some gold embossing powder and for the rest I used Versafine Onyx Black ink and heat embossed in clear. I adhered all the images to the vellum using some foam tape for dimension. Embellished with some Nuvo Crystral Drops and called it done! πŸ™‚
Here is the finished look..cute isn’t it!

SONY DSCSONY DSC

cheers,

Tej

4

Red and blue birthday card..

Hello crafty friends! Today’s post is all about the birthday card I made for my sister. Her favourite color is red..so of course the card is based on that..
I wanted to use the Altenew ‘Morning Glory’ set 1 & 2 for a while now and this gave me the opportunity. I also decided to do some loose watercoloring for a more “artistic” flair! πŸ™‚

So to start off, I repeatedly stamped the morning glory outline on my card panel on a diagonal. For stamping, I used Versamark embossing ink and then heat embossed the images with silver embossing powder. Then I sprayed the card panel with clean water and just added ink loosely. I used ‘Peacock Feathers’ & ‘Abandoned Coral’ distress inks for watercoloring. I let the panel dry a bit and again repeated the process to intensify the colors. I loved the result!! The inks that flowed out of the embossed lines created a nice soft halo around the images and it looks really cool! πŸ™‚
To define the flowers, I used the detailed stamp and stamped the details using a light grey ink..love the slight depth this gives! To finish off, I added silver gel pen dots around the flowers alongwith a few star sequins.

For the sentiment, I wanted it to stand off from the background, so I used a vellum strip and heat embossed the sentiment using VersaFine onyx black ink and some clear embossing powder. The strip looked a bit bare to me when I attached it to the card panel, so I heat embossed one more morning glory stamp and colored it using the same ‘Abandoned Coral’ distress ink. For the flower centers, I again used the grey ink. I adhered the flower using some foam tape on the vellum strip. I then mounted the card panel on some dark colored pattern paper and adhered that lot to a red cardstock cut to A-2 card size. To finish off, a bit of wink of stella on the flowers for a shimmery effect!
Here is the finished look..

SONY DSCSONY DSC

I am entering this card for this week’s Color Throwdown challenge #450 ( http://colorthrowdown.blogspot.com.au/) where the colors to use are Red, Blue, Yellow & white). I am also adding this entry to this month’s Flower Challenge #10 (https://theflowerchallenge.blogspot.com.au/) where the theme is to use embossing. Fingers crossed! πŸ™‚

Happy crafting!! Thanks for stopping by!

Cheers..

Tej

0

Birthday Notecard

Hello! Today I am back with a very simple notecard. This was the first time I tried making a square card. I had a nested cross-stitched square die-set from Gina Marie Designs since forever in my stash and I decided to put it to use.
I cut a card panel from some water-color paper. I love how the cross-stitch detail looks. Then I heat embossed a mini stamp-set called Floral Flourish from Mudra Craft Stamps (an Indian stamp company). I wanted to try out water-coloring an embossed image..yes believe it.. this was my first time! To make the image pop I used gold
embossing powder.
I then coloured the image using the Zig clean color real brush markers..(whoa that’s a mouthful! πŸ™‚ ).. I mainly used oranges, greens and brown to color my image. I wanted to participate in this week’s Color Throwdown Challenge #449 (http://colorthrowdown.blogspot.com.au/)..hence the color choice..which I have to say in hindsight does not go that well with gold embossing..maybe it would have looked better with white..well for another time.. I also used the Kaisercraft bubble-wrap stamp-set to create some texture around the stamped image..
To finish up I stamped the Happy Birthday sentiment from Kaisercraft using some Versafine Onyx black ink. A few black ink splatters and a bit of black twine finished the card panel. To embellish, I used some coffee colored sequins, nuvo drops and wink of stella clear glitter pen.

I then foam mounted the card panel on some green pattern paper and adhered that to some kraft cardstock. That’s all! Clean & simple πŸ™‚ .. well for me atleast!.. πŸ™‚

Here is the finished card..

Processed with Rookie CamProcessed with Rookie Cam

thanks for looking..

cheers..

Tej